Entra ID Application Integration Guide


This page is your starting place for integrating an application with the UW Entra ID. This page contains links to related pages which will assist you with the integration process, as well as guidelines to help you determine if integrating with Entra ID is the right choice. Integrating a web application with Entra ID can be very simple, slightly involved, or complex depending on the scenario. This guide covers most of the possibilities to to be comprehensive but for that reason it can appear very daunting. Here are some reasonable guidelines about the difficulty level, depending on your scenario:

I have… Expected difficulty level
Vendor provided web application which has an Entra ID application gallery template Easy
Web application which uses SAML Easy
Web application which uses OpenID Intermediate
Web application which uses OpenID & OAuth2 Complex
Native or mobile app which uses OpenID Intermediate
Native or mobile app which uses OpenID & OAuth2 Complex
Any scenario which involves SCIM based user provisioning Complex

As with all tasks, experience makes a difference, and what may be easy for one person may be difficult for another. In all cases, UW-IT is happy to assist, so feel free to reach out. NOTE: This page is incomplete. Content is expected to be finished by 7/28/2023. [accordion name='Entra ID Application Integration Guide topics'] [section title='Picking the right identity provider integration solution'] Web applications can be integrated with UW NetIDs and the UW Groups service via a variety of methods, including Entra ID and UW Shibboleth. UW Shibboleth and Entra ID are both generally recommended. Guide to which UW Identity Provider your web application should prefer:

Web app ... UW Entra ID UW Shibboleth
requires use of SAML or OIDC

X

X

requires use of WS-Federation or WS-Trust protocols

X

 
requires the OAuth protocol

X

 
requires integration with Office 365 or other Entra ID apps

X

 
requires user provisioning via the SCIM protocol

X

 
has an Entra ID application gallery template

X

 
requires support team access to app sign in logs

X

 
requires custom terms of use

X

 
requires Research and Scholarship category support  

X

requires custom IdP metadata  

X

requires multilateral SAML federation  

X

requires support for social identities such as Facebook

X

 
requires broadest possible set of identity providers

X

 
requires better user experience via sign in only when required

X

 
requires group claims for member-private groups  

X

requires claims involving confidential data  

X

requires simple conditional access controls such as: -group membership -IP address

X

X

requires advanced conditional access controls including: -location (IP, GeoRegion, or GPS) -device platform -client application -client device state -sign in risk -application specific restrictions

X

 
requires stronger fraud protections such as: -behavior analytics to flag risky signs in such as: atypical travel, unknown/suspect locations, patterns matching known compromised account signatures -detection of publicly leaked credentials -high volume of daily security signals

X


  [/section] [section title='Scenario based checklists for Entra ID app integration']

  Gallery Web app w/ SAML Web app w/ OIDC Web app w/ OIDC + OAuth Native app w/ OIDC Native app w/ OIDC + OAuth App w/SCIM
Terminology plus icon plus icon plus icon plus icon plus icon plus icon plus icon
Concepts plus icon plus icon plus icon plus icon plus icon plus icon plus icon
Navigation plus icon plus icon plus icon plus icon plus icon plus icon plus icon
Creation Checkmark icon tick icon tick icon tick icon tick icon tick icon tick icon
Config intro plus icon plus icon plus icon plus icon plus icon plus icon plus icon
Config: SAML   tick icon         question icon
Config: OIDC & OAuth     tick icon tick icon tick icon tick icon question icon
Config: More details   question icon question icon question icon question icon question icon question icon
Config: Assignment plus icon plus icon plus icon plus icon     tick icon
Verify connectivity question icon plus icon question icon question icon question icon question icon question icon
Claims question icon plus icon question icon question icon question icon question icon question icon
Scopes question icon     question icon   question icon question icon
Consent question icon     question icon   question icon question icon
Provisioning question icon question icon question icon question icon question icon question icon tick icon
Conditional Access question icon question icon question icon question icon question icon question icon question icon

Symbols reference

Symbol
Meaning
tick icon Required
plus icon Recommended
question icon Optional depending on needs
Checkmark icon Required, but UW-IT performs

[/section] [section title='Overview of the process'] The process of integrating a web application varies greatly depending on the specific application. There are two cases in general:

In general, these are the steps taken:

  1. Create Entra ID application (and possible service principal) object (may require UW-IT)
  2. Configure application basics & verify connectivity
    1. Client identifier
    2. Credentials
    3. Metadata
    4. Owners
  3. Add optional application configurations based on your specific requirements
    1. Optional: Configure SAML claims
    2. Optional: Configure OAuth scopes (requires UW-IT)
    3. Optional: Configure OAuth consent (may require UW-IT)
    4. Optional: Configure SCIM user provisioning (may require UW-IT)
    5. Optional: Configure Conditional Access (requires UW-IT)
  4. Verify desired functionality
  5. Assign users to the Entra ID application either via group (preferred) or by user
  6. Release

[/section] [section title='Entra ID Application Terminology'] Microsoft has a few terms which can be a bit confusing if you don't understand what they mean:

[/section] [section title='Entra ID Application Concepts'] Most of the content here is also represented at https://learn.microsoft.com/en-us/azure/active-directory/develop/active-directory-how-applications-are-added. Because everyone learns information slightly differently, you may find one or the other easier to understand.

  1. There are many meanings of the word "application." When we talk about an Entra ID Application, we are talking about something very specific. An Entra ID Application is a digital identity and some associated configuration which informs Entra ID about how to treat software which uses that digital identity. The software itself may be running anywhere, on any platform, written in any language. To be more specific, if software needs to request Entra ID logon tokens or consume Entra ID logon tokens, then it must be an Entra ID application. The software might have other digital identities it uses, but that topic isn't covered here.
  2. An Entra ID application is represented by two types of objects in Entra ID:
    1. An object of type application. This is the core digital identity with the basic required configuration details, and is only present in the Entra ID application's home tenant.
    2. One or more objects of type service principal. This object will be present in each tenant which has an instantiation of the Entra ID application, except the Entra ID application's home tenant. This object will have the specific role assignments and user consent permissions granted for that tenant. Note: An Entra ID application's instantiation in a given tenant is the service principal object–but that service principal references the "primary" Entra ID object of type application that lives in one and only one tenant. You can read more about these Entra ID objects here.
  3. All Entra ID applications involve consent of some kind. There are generally two kinds of consent:
    1. User consent. The end user is presented with a list of permissions the Entra ID application would like, if you agree to grant them. If the user does not consent, then they can not use the application.
    2. Admin consent. The tenant admin is presented with a list of permissions the Entra ID application would like. Admin consent is required if the required application permissions are broader in scope than what an individual user can grant for themselves. If admin consent is required, then no user can use the application until admin consent. Optionally a tenant admin can provide the user consent decision on behalf of all users. In this case, the end user never sees the user consent dialog.
    3. An Entra ID application instance will record all consent permissions granted within that tenant related to itself (on the service principal object).
  4. OAuth permission scopes are one of two kinds: application or delegated.
    1. Application permissions are those which are used solely by the application identity itself. You use these type of permissions for a non-interactive application that is doing work without a human interacting with that application. Application permissions require admin consent because there is no user consent experience by design.
    2. Delegated permissions are those which require a user to interactively sign into the application. The user consents to the permissions, which authorizes the application to act on behalf of the user with the permissions which that user has consented to. If an admin consents to delegated permissions then users don't consent.
  5. Entra ID Applications come in two fundamental flavors--confidential clients and public clients. Confidential clients need to authenticate as themselves, so must have credentials–these are typically web apps or code used to programmatically leverage the API of another Entra ID application. Public clients do not need to authenticate as themselves and typically represent native clients broadly distributed on many devices. So the key differentiator here is whether the application needs to get a logon token for itself–and that is usually dependent on whether it needs to access another Entra ID application. Most Entra ID Apps will be confidential clients. Note: public clients do not have a service principal in each tenant–they are only ever present in the developer's tenant. If you'd like to explore public clients further, you might review the 'Native Application to Web API' section of https://azure.microsoft.com/en-us/documentation/articles/active-directory-authentication-scenarios/.
  6. If an Entra ID Application needs a credential, then it has two options–a password or a cert. See more here.
  7. An Entra ID application may define whether it is available to other tenants.
  8. An Entra ID application must define what permissions to other Entra ID applications it needs. To only authenticate other users, you do not need any permission, but if you need to include name or other basic data in the user experience, then you will likely need User.Read, i.e. the ability to read the profile of an Entra ID user who has logged into your application. You can read more about permission scopes, including the permission scopes that Entra ID itself has available at https://msdn.microsoft.com/Library/Azure/Ad/Graph/howto/azure-ad-graph-api-permission-scopes.
  9. An Entra ID application may define permission scopes that can be granted to other Entra ID applications. This is optional.
  10. Entra ID application assignments
    1. Each app may define roles which users can be assigned to. This is optional. Each Entra ID application instance will record any role assignments.
    2. Each Entra ID application instance may require assignment of users or groups to be able to access to the app. This is optional. Note that if assignment is required, a basic role is created even if the application doesn't define any roles.
    3. Each app can have owners defined, but they are not represented in the roles property. Application Owners have a broad set of permissions.
  11. An Entra ID application records the URIs that tokens it requests are issued to. A given Entra ID application may have many valid URIs. You might imagine using the same Entra ID application for a production, pre-production, and development instance of the code behind your Entra ID application, each with their own distinct URI. Or you can create a separate Entra ID application for production, pre-production, and development purposes.

[/section] [section title='Entra ID Applications: Azure Portal Navigation'] This content is at Entra ID Applications: Azure Portal Navigation [/section] [section title='Entra ID Application Creation'] If your application is pre-integrated, it will be listed in the Entra ID application gallery. To proceed, contact UW-IT to get started via help@uw.edu with a subject line of “Entra ID application: X” where X is the name of the application. The application object created via this process will be pre-configured to work correctly. You will supply key information and possibly take actions during the process to achieve the final configuration. Otherwise, you should be able to create the application object yourself. Microsoft has a guide to this process here: https://docs.microsoft.com/en-us/azure/active-directory/develop/quickstart-register-app. [/section] [section title='Entra ID Application Configuration: Intro'] This basic configuration section covers the basic required elements which must be configured for an Entra ID application. If you are integrating a web application with Entra ID, there are several key pieces of information that are required to get your web application to actually use UW Entra ID. Which information is needed depends on the protocol your web application uses, but there are some general pieces of information that are useful across all of them.  What information a given application will need can vary, however, there are a couple pieces of information which are almost always useful.

Tenant ID

You may be asked to supply your tenant ID -- this can sometimes be called the Entra ID tenant ID, Office 365 tenant ID, or Microsoft 365 tenant ID. All of these names mean the same thing. Tenant ID: f6b6dd5b-f02f-441a-99a0-162ac5060bd2

Endpoints

Modern web applications integrate via one or more endpoints that an identity provider supplies, each of which supports a specific protocol and has different expected authentication flows associated with it. Microsoft identity provider endpoints generally have the following syntax:

Where {tenant} specifies which accounts are allowed and can have one of 5 values:

Where {protocol} specifies which protocol endpoint and may have additional specifics. The following are the most common:

More information about Microsoft endpoint URLs can be found at https://docs.microsoft.com/en-us/azure/active-directory/develop/msal-client-application-configuration. [/section] [section title='Entra ID Application Configuration: SAML '] For SAML, you’ll likely need:

where you supply the appId specific to the Entra ID service principal. For example: https://login.microsoftonline.com/f6b6dd5b-f02f-441a-99a0-162ac5060bd2/federationmetadata/2007-06/federationmetadata.xml?appid=dd67ec83-9784-44ca-b640-4efe95399fb8 NOTE: do not use this URL–you need the one specific to your application.

  [/section] [section title='Entra ID Application Configuration: OIDC and OAuth'] For OIDC and OAuth, the platform for your application alters the basic requirements. If you are using OIDC/OAuth with delegated permissions, you *must* have a Redirect URI--this is the only way a user can get to the code your application identity is using. If you are using OIDC/OAuth with application permissions, the Redirect URI may not be necessary because no human needs to interact with your application identity. For Web and single-page applications (SPA) you’ll need:

For iOS/MacOS, you will need:

For Android, you will need:

For mobile and native clients, you will need:

In all cases, the Entra ID service principal will need:

In all cases, the software configuration will need:

See https://docs.microsoft.com/en-us/azure/active-directory/develop/v2-protocols-oidc#send-the-sign-in-request for more details on what the OIDC software must send.

Note: OAuth2 supports a variety of access flows. Additional information may be required or recommended for those flows.

  [/section] [section title='Entra ID Application Configuration: More details'] https://docs.microsoft.com/en-us/azure/active-directory/develop/active-directory-v2-protocols has a more complete explanation of the required configuration information so if you are confused, it may provide the answers you seek. If you are writing your own application, you may want to review the OIDC flow, OAuth2 flow and SAML flow depending on which protocols you are leveraging. [/section] [section title='Entra ID Application Configuration: User Assignment'] To ensure that the desired end users have access to your Entra ID application, you need to assign the application to them. Pre-requisites:

There are many ways to assign applications, including by user, by group, and by access packages.

NOTE: Nested groups do not receive access to an Entra ID application.
NOTE: If you are provisioning users to your application via SCIM, then you must use group based assignment.

Because assigning by group is the simplest and most common option, we only cover it.

First, find the service principal under Enterprise Applications:

Follow these steps to find a service principal under Enterprise Applications:
    1. Sign in to the Azure portal.


    1. If you have access to multiple tenants, use the Directories + subscriptions filter Filter icon. in the top menu to switch to the tenant in which you want to register the application.


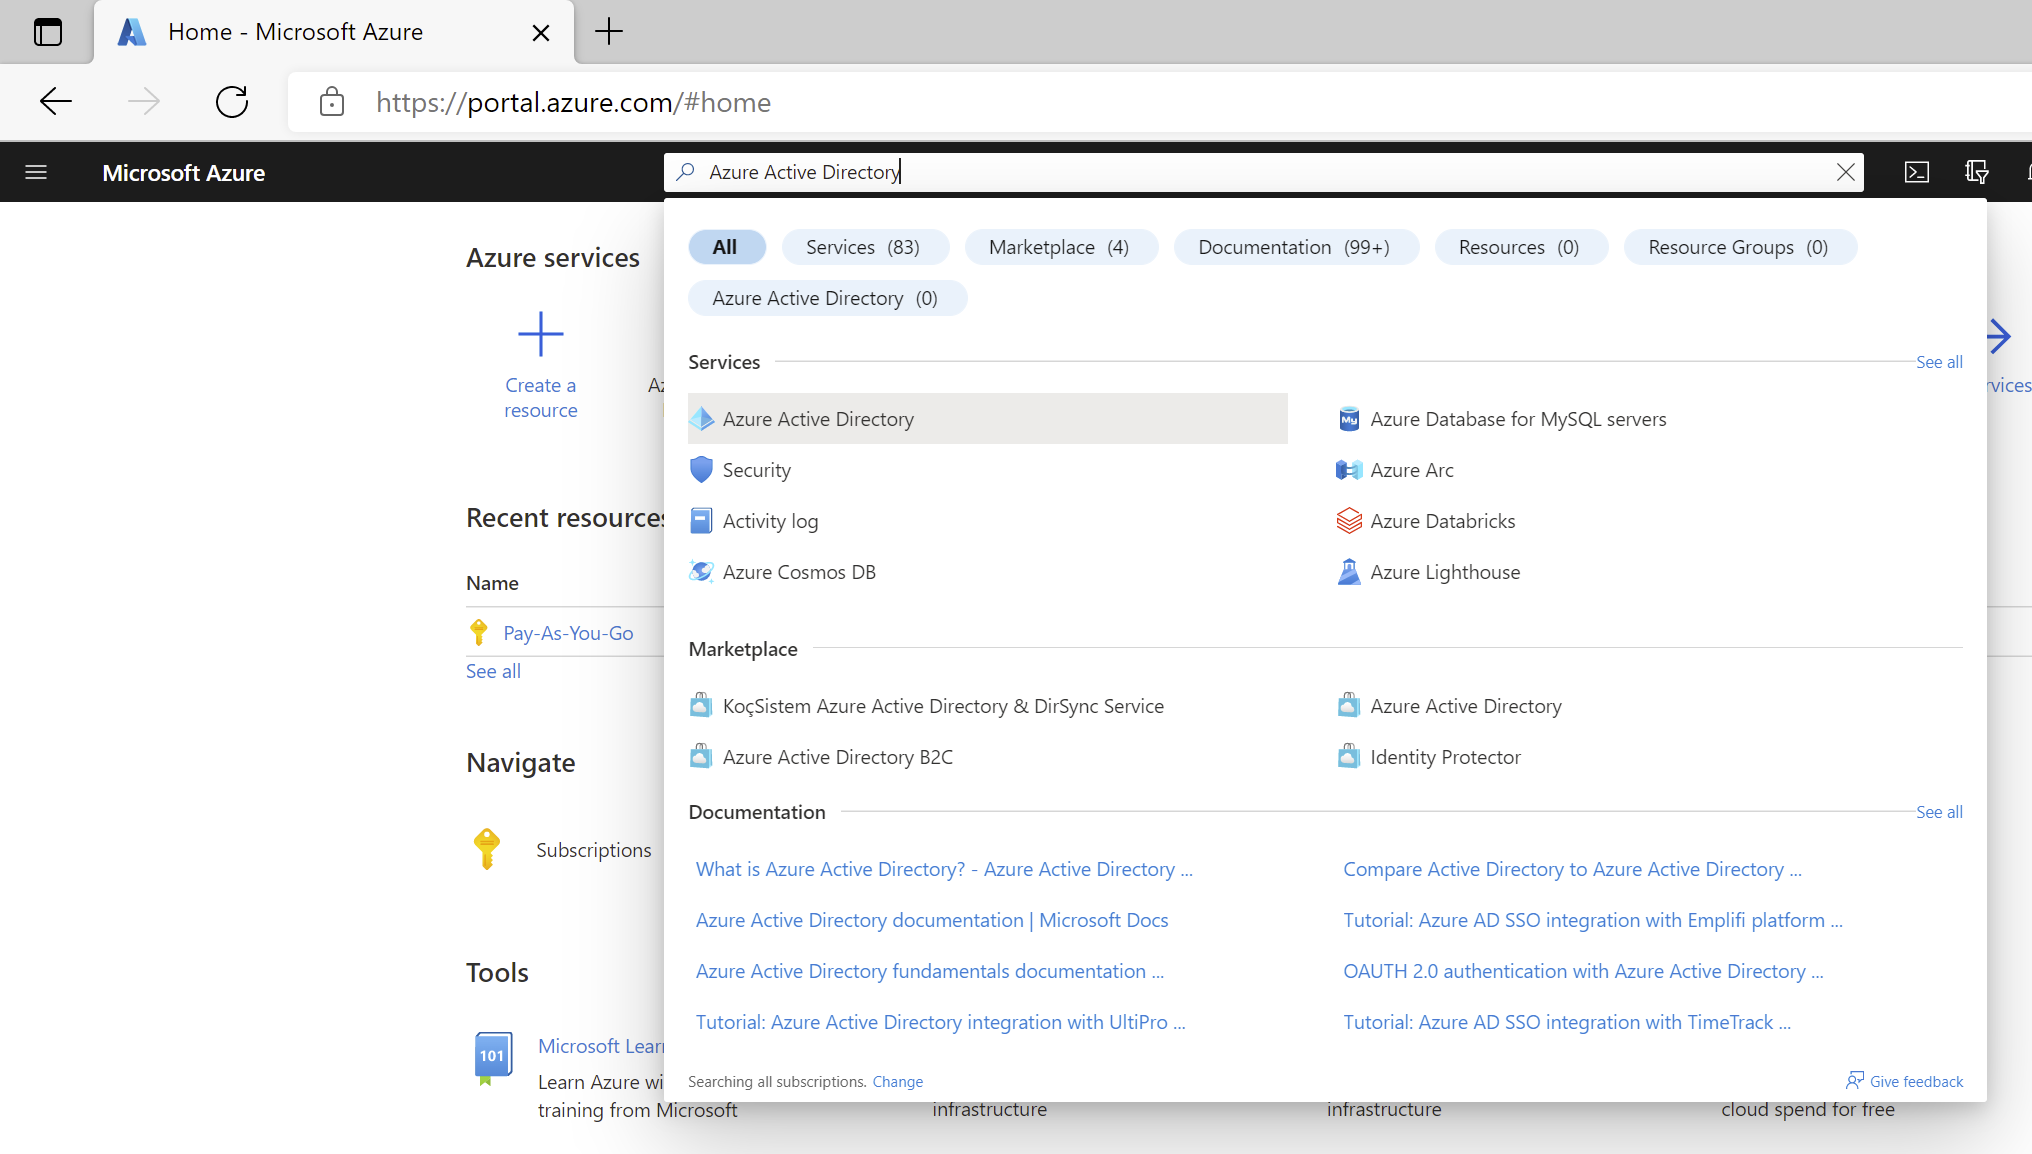
    1. Search for and select Entra ID.Screenshot of Microsoft Azure home page.


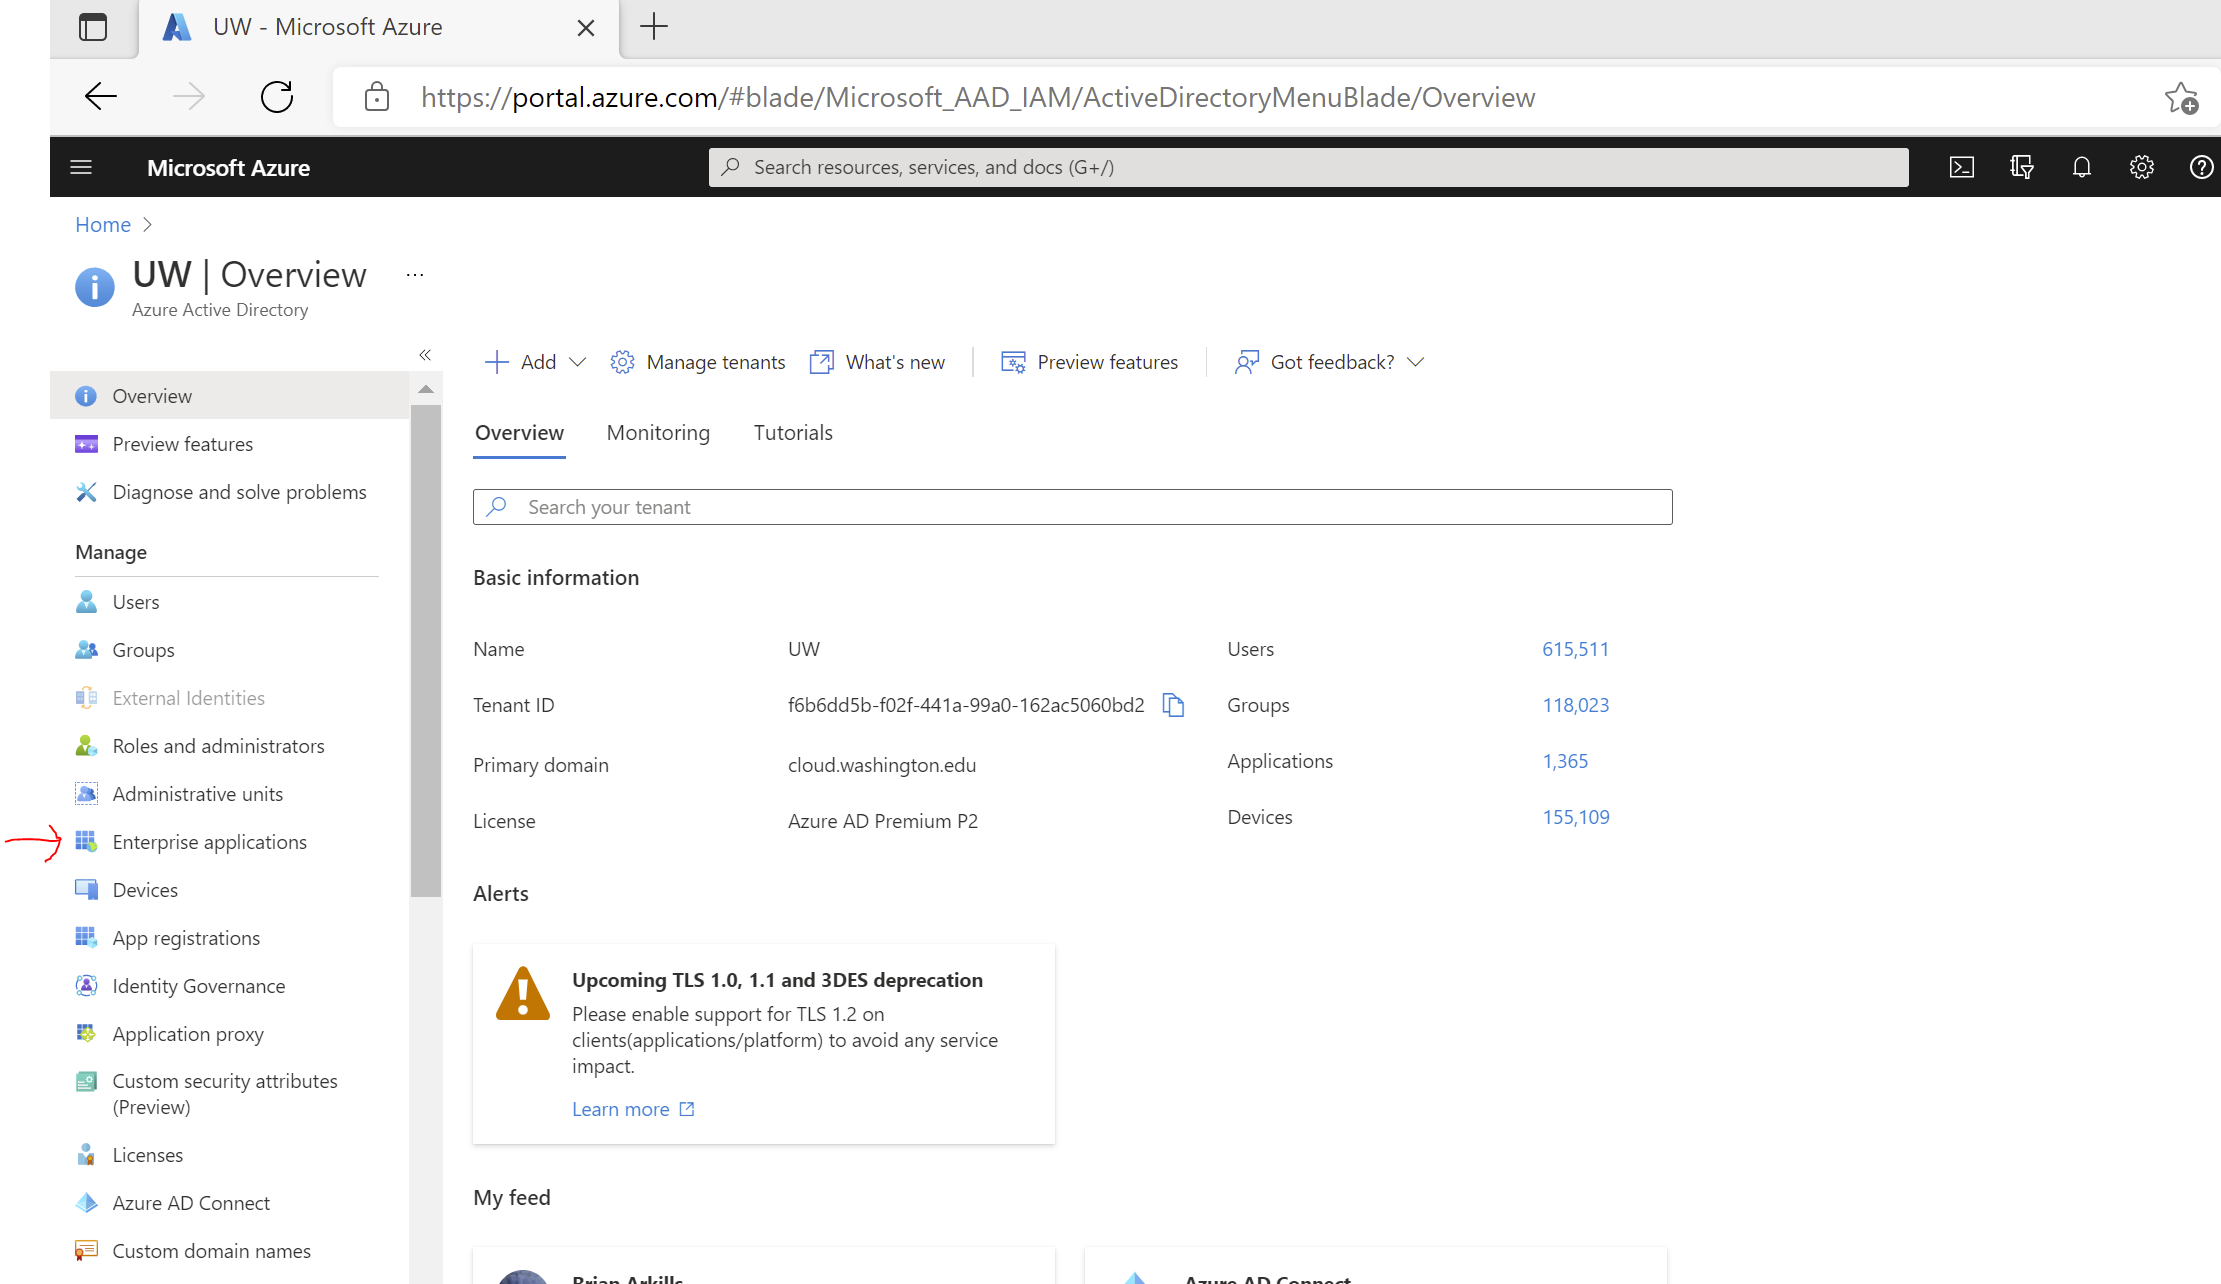
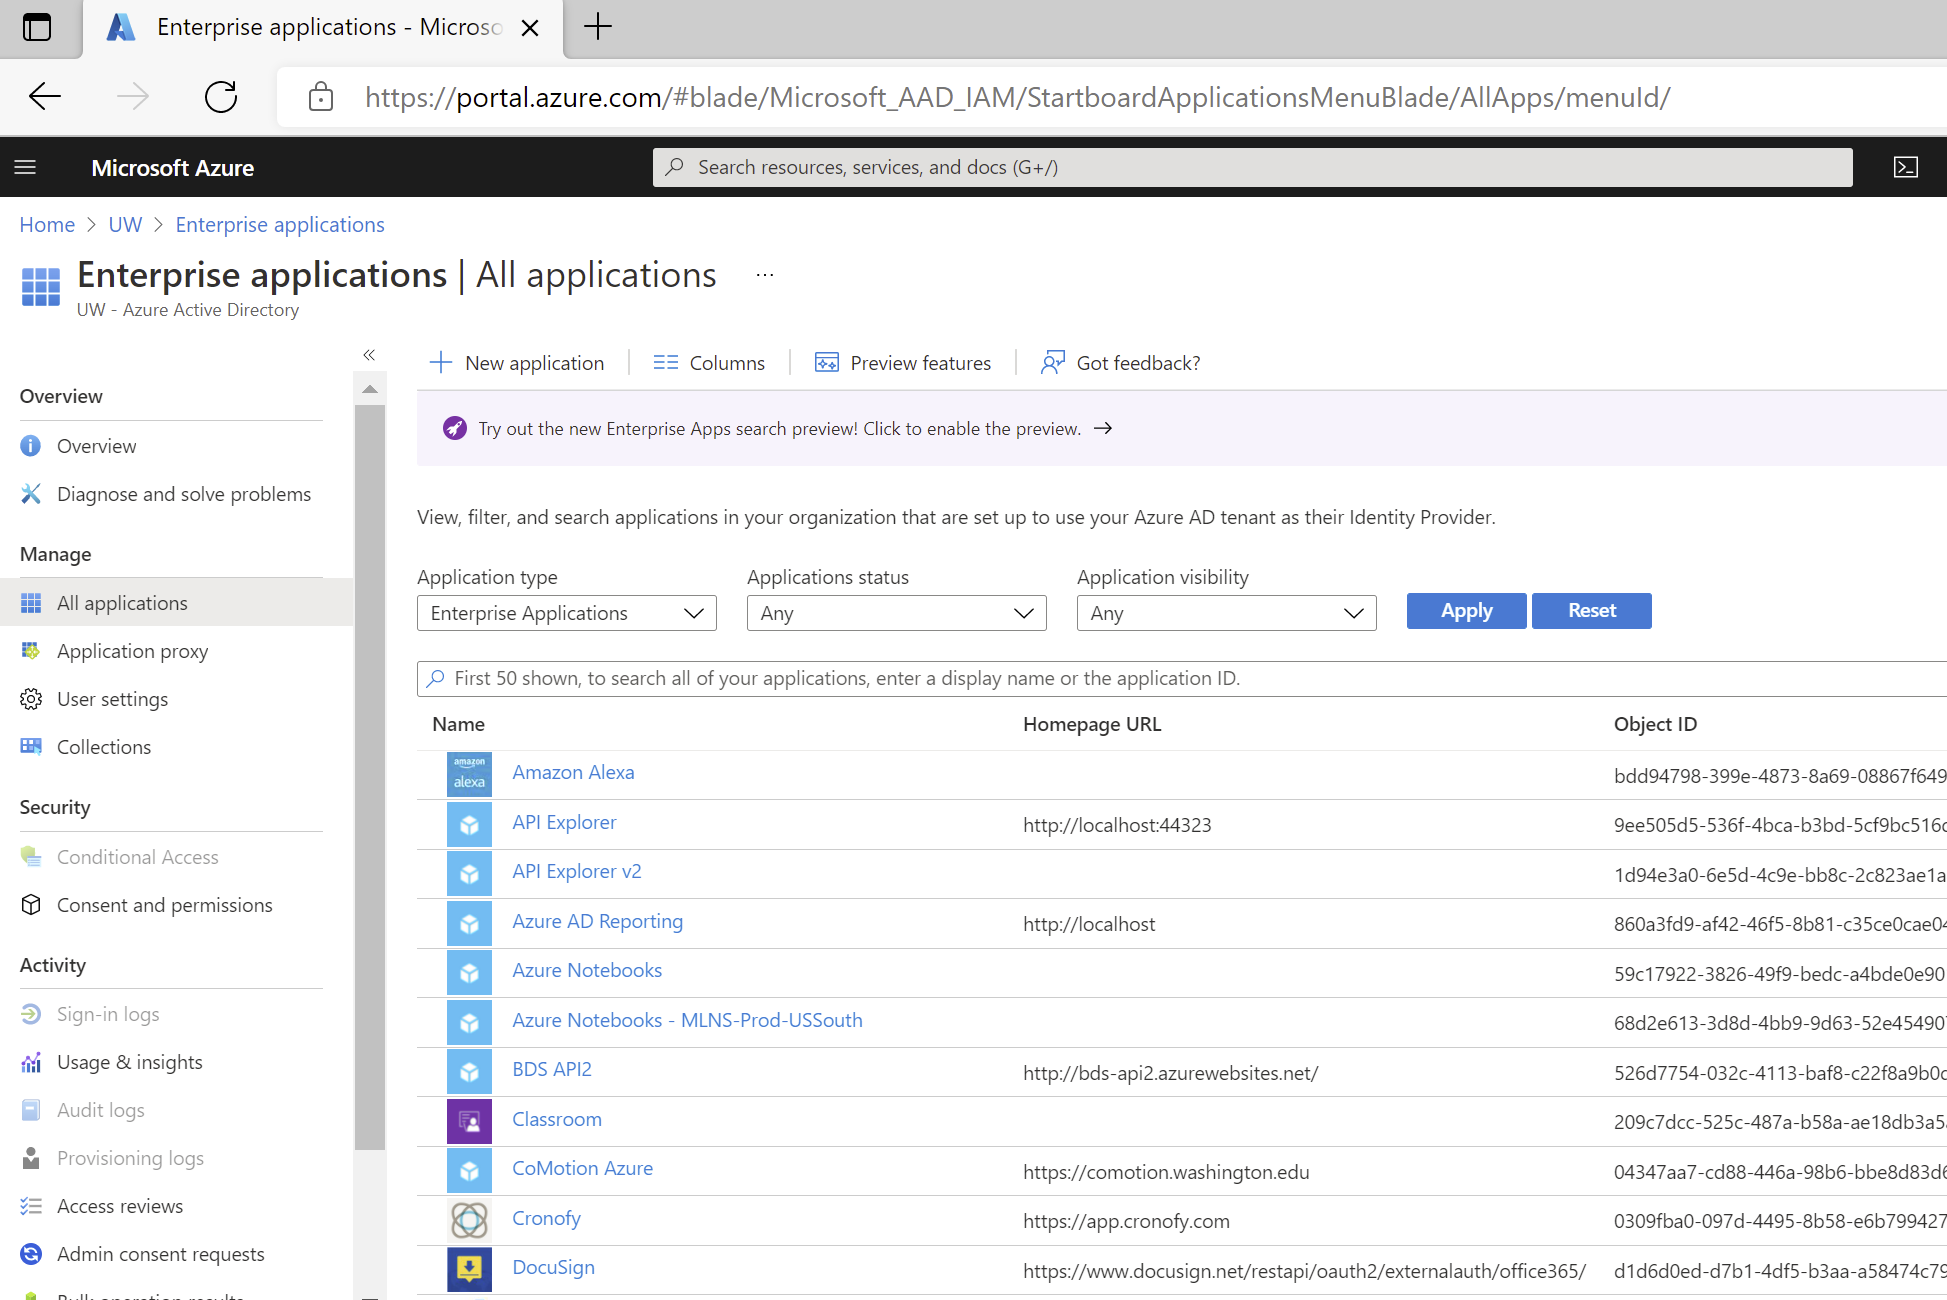
    1. Under Manage, select Enterprise Applications. Screenshot showing "Enterprise applications" left menu option in Azure Active Directory. This will take you to the 'All Applications' page of Enterprise Applications, where you can browse or search for a specific service principal (i.e. the specific instance of an application in this tenant) Screenshot of "Enterprise applications" page.


    1. Enter the name or application id of the service principal. There are also some limited filters you can use to try to find your service principal, if you don't happen to know the name or app id. The search here tends to be pretty flexible, finding applications regardless of case sensitivity.


Tip: Unlike App Registrations there is no "Owned application" tab, which lets you find applications for which you are an owner quickly. You may find it quicker to use App Registrations > Owned applications > Your app and use the "Go to Enterprise applications" button to get to the right service principal object within Enterprise Applications.

Next, add the assignment(s):

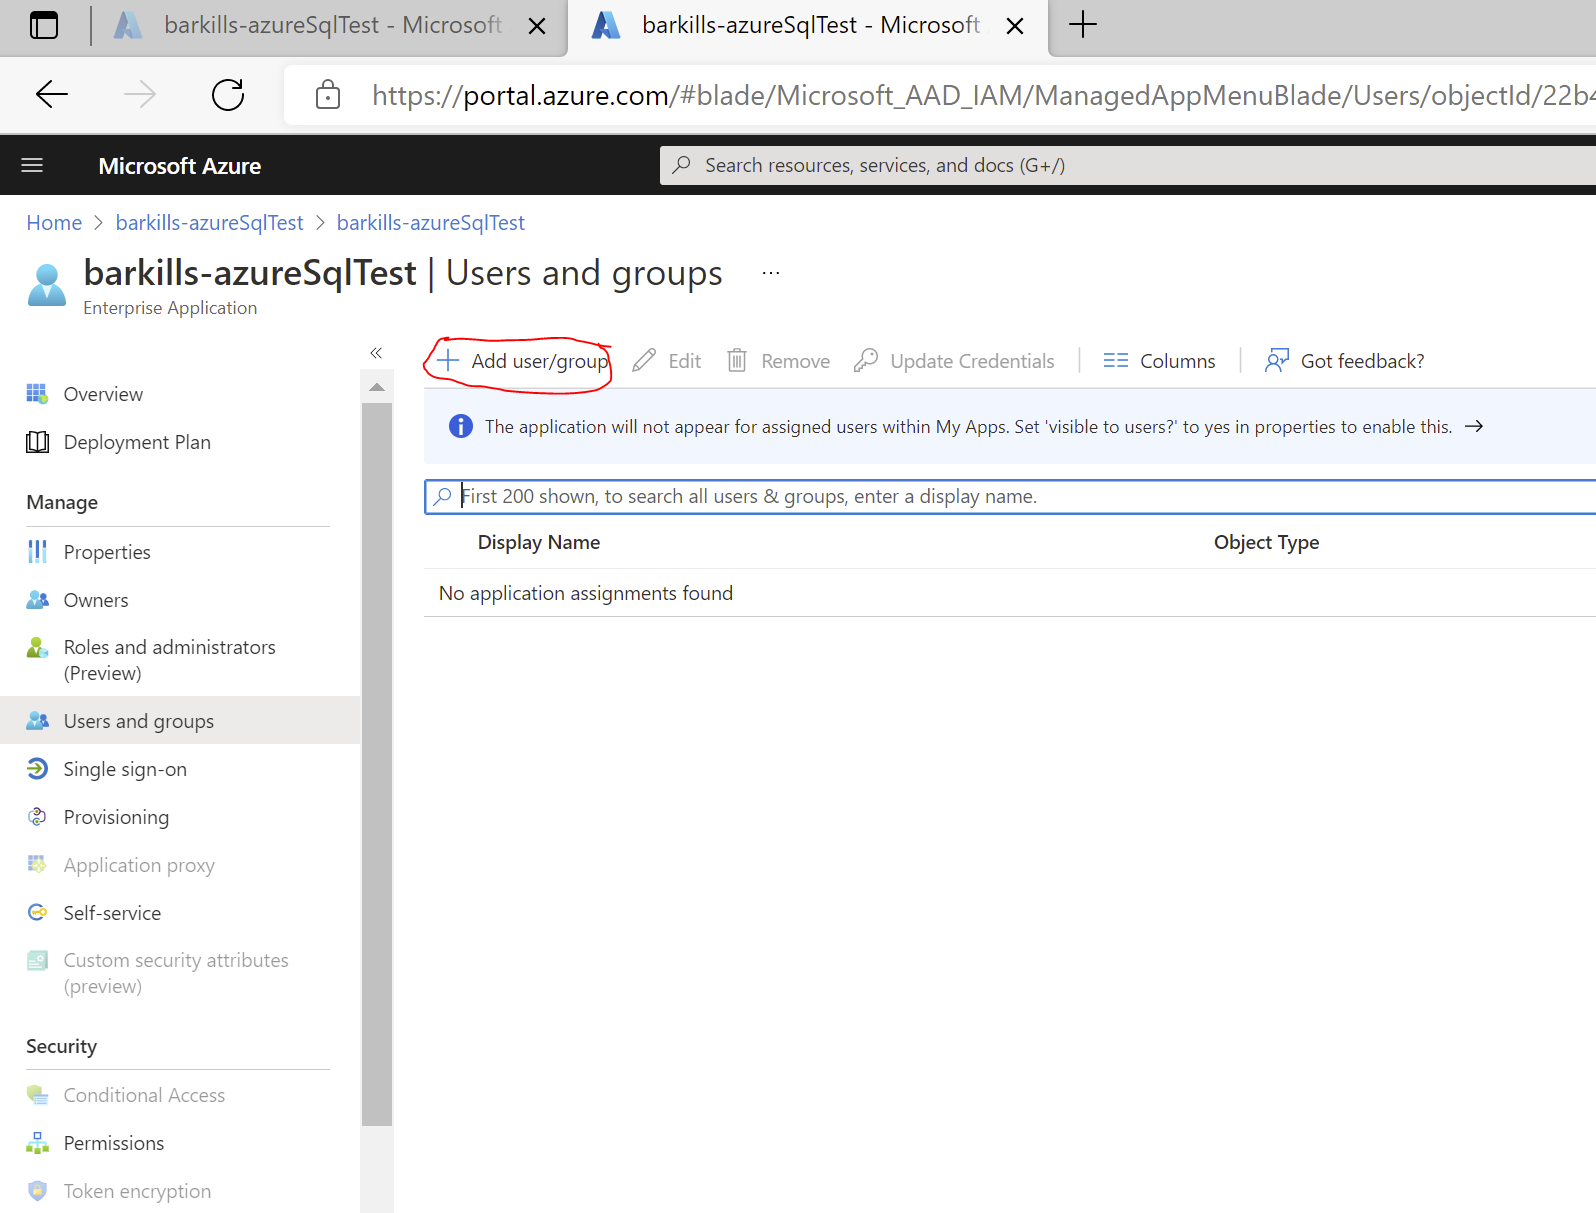
  1. In the left navbar under “Manage”, select the “Users and groups” option
  2. Click “Add user/group” at the top of the screen Screenshot showing "Add user/group" button.
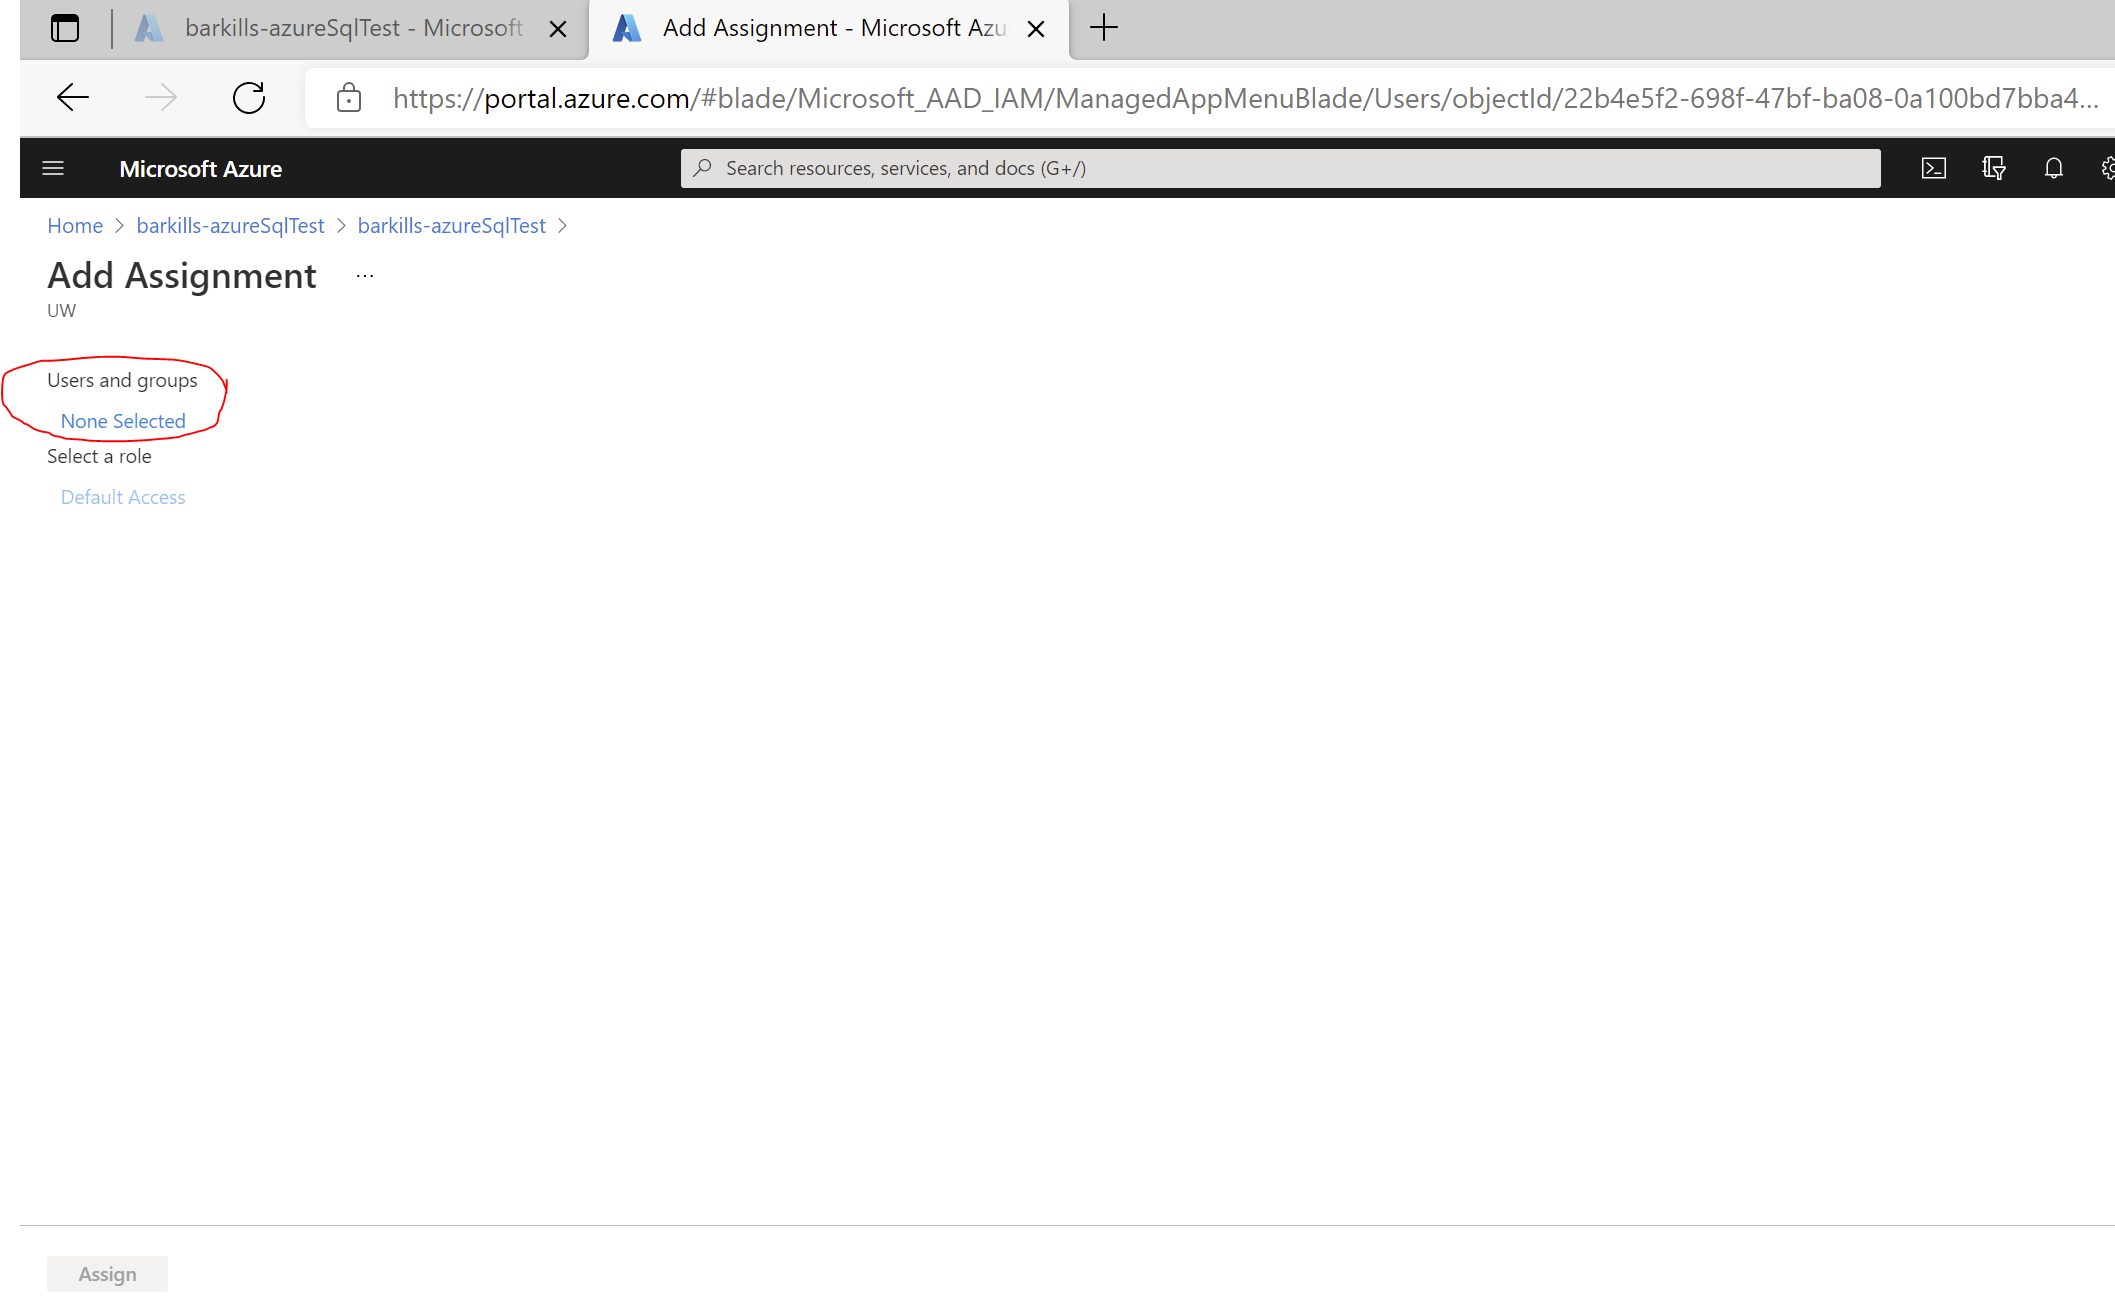
  3. Click on None Selected under Users and Groups Screenshot showing "None Selected" link.
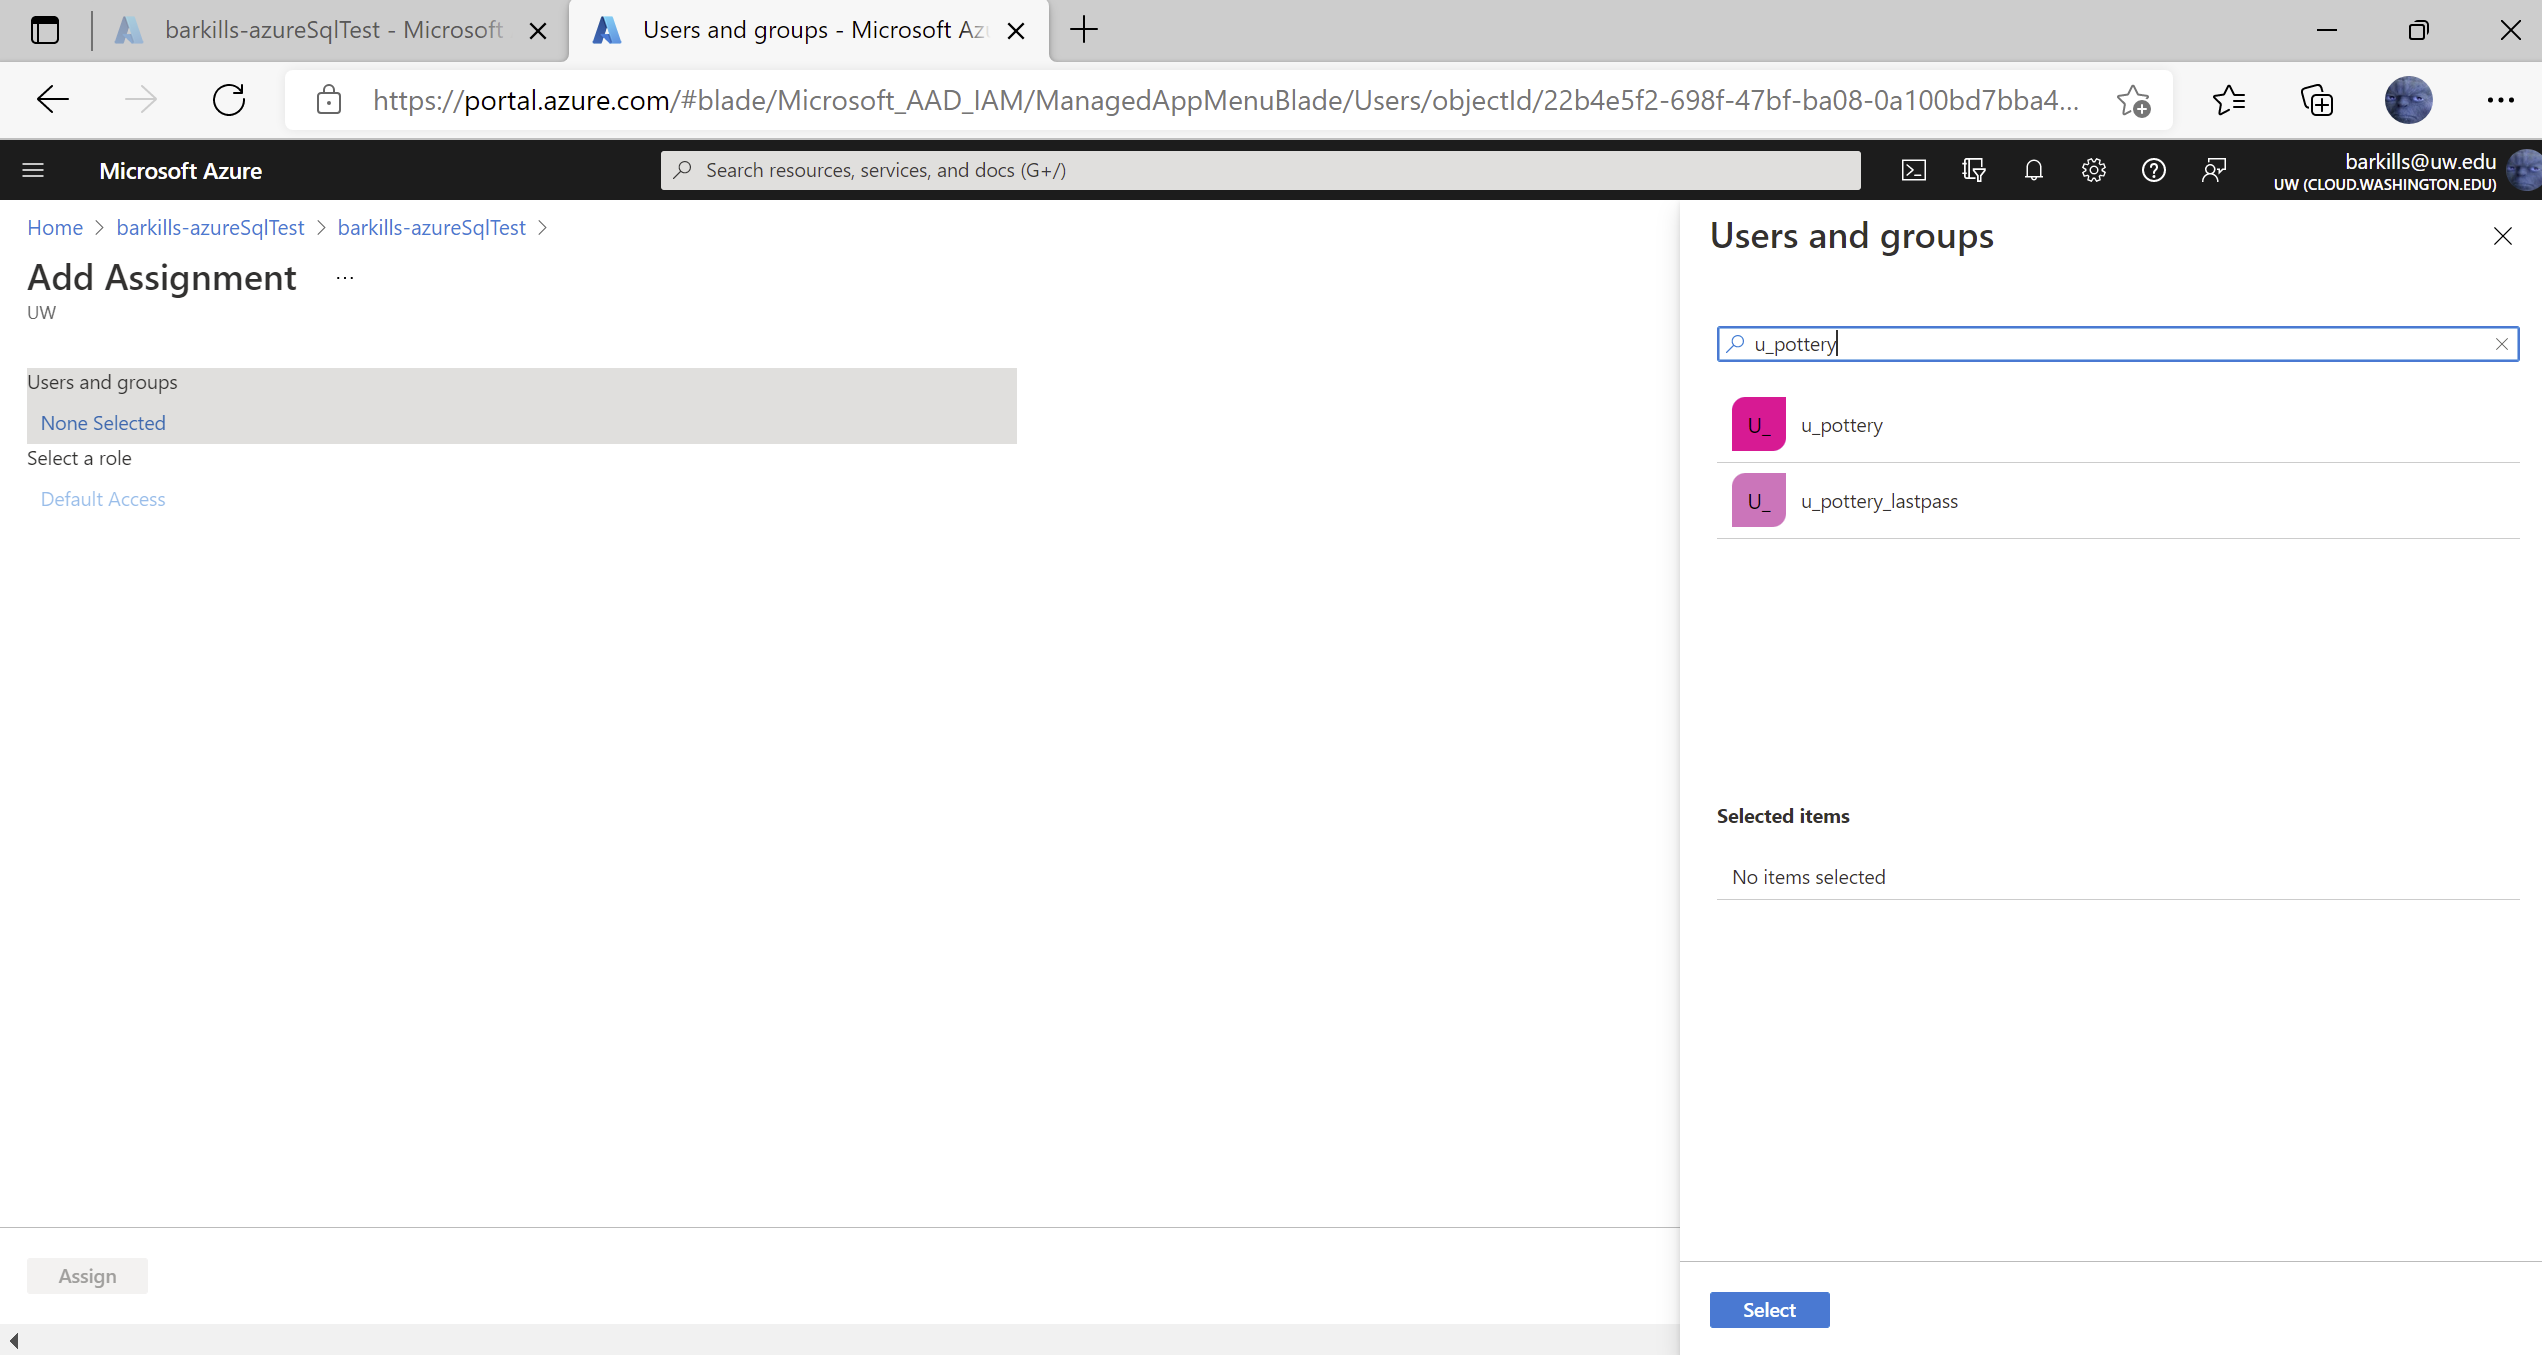
  4. In the picker on the right, enter the group id of the desired group, e.g. u_pottery Screenshot showing search bar in picker on the right.
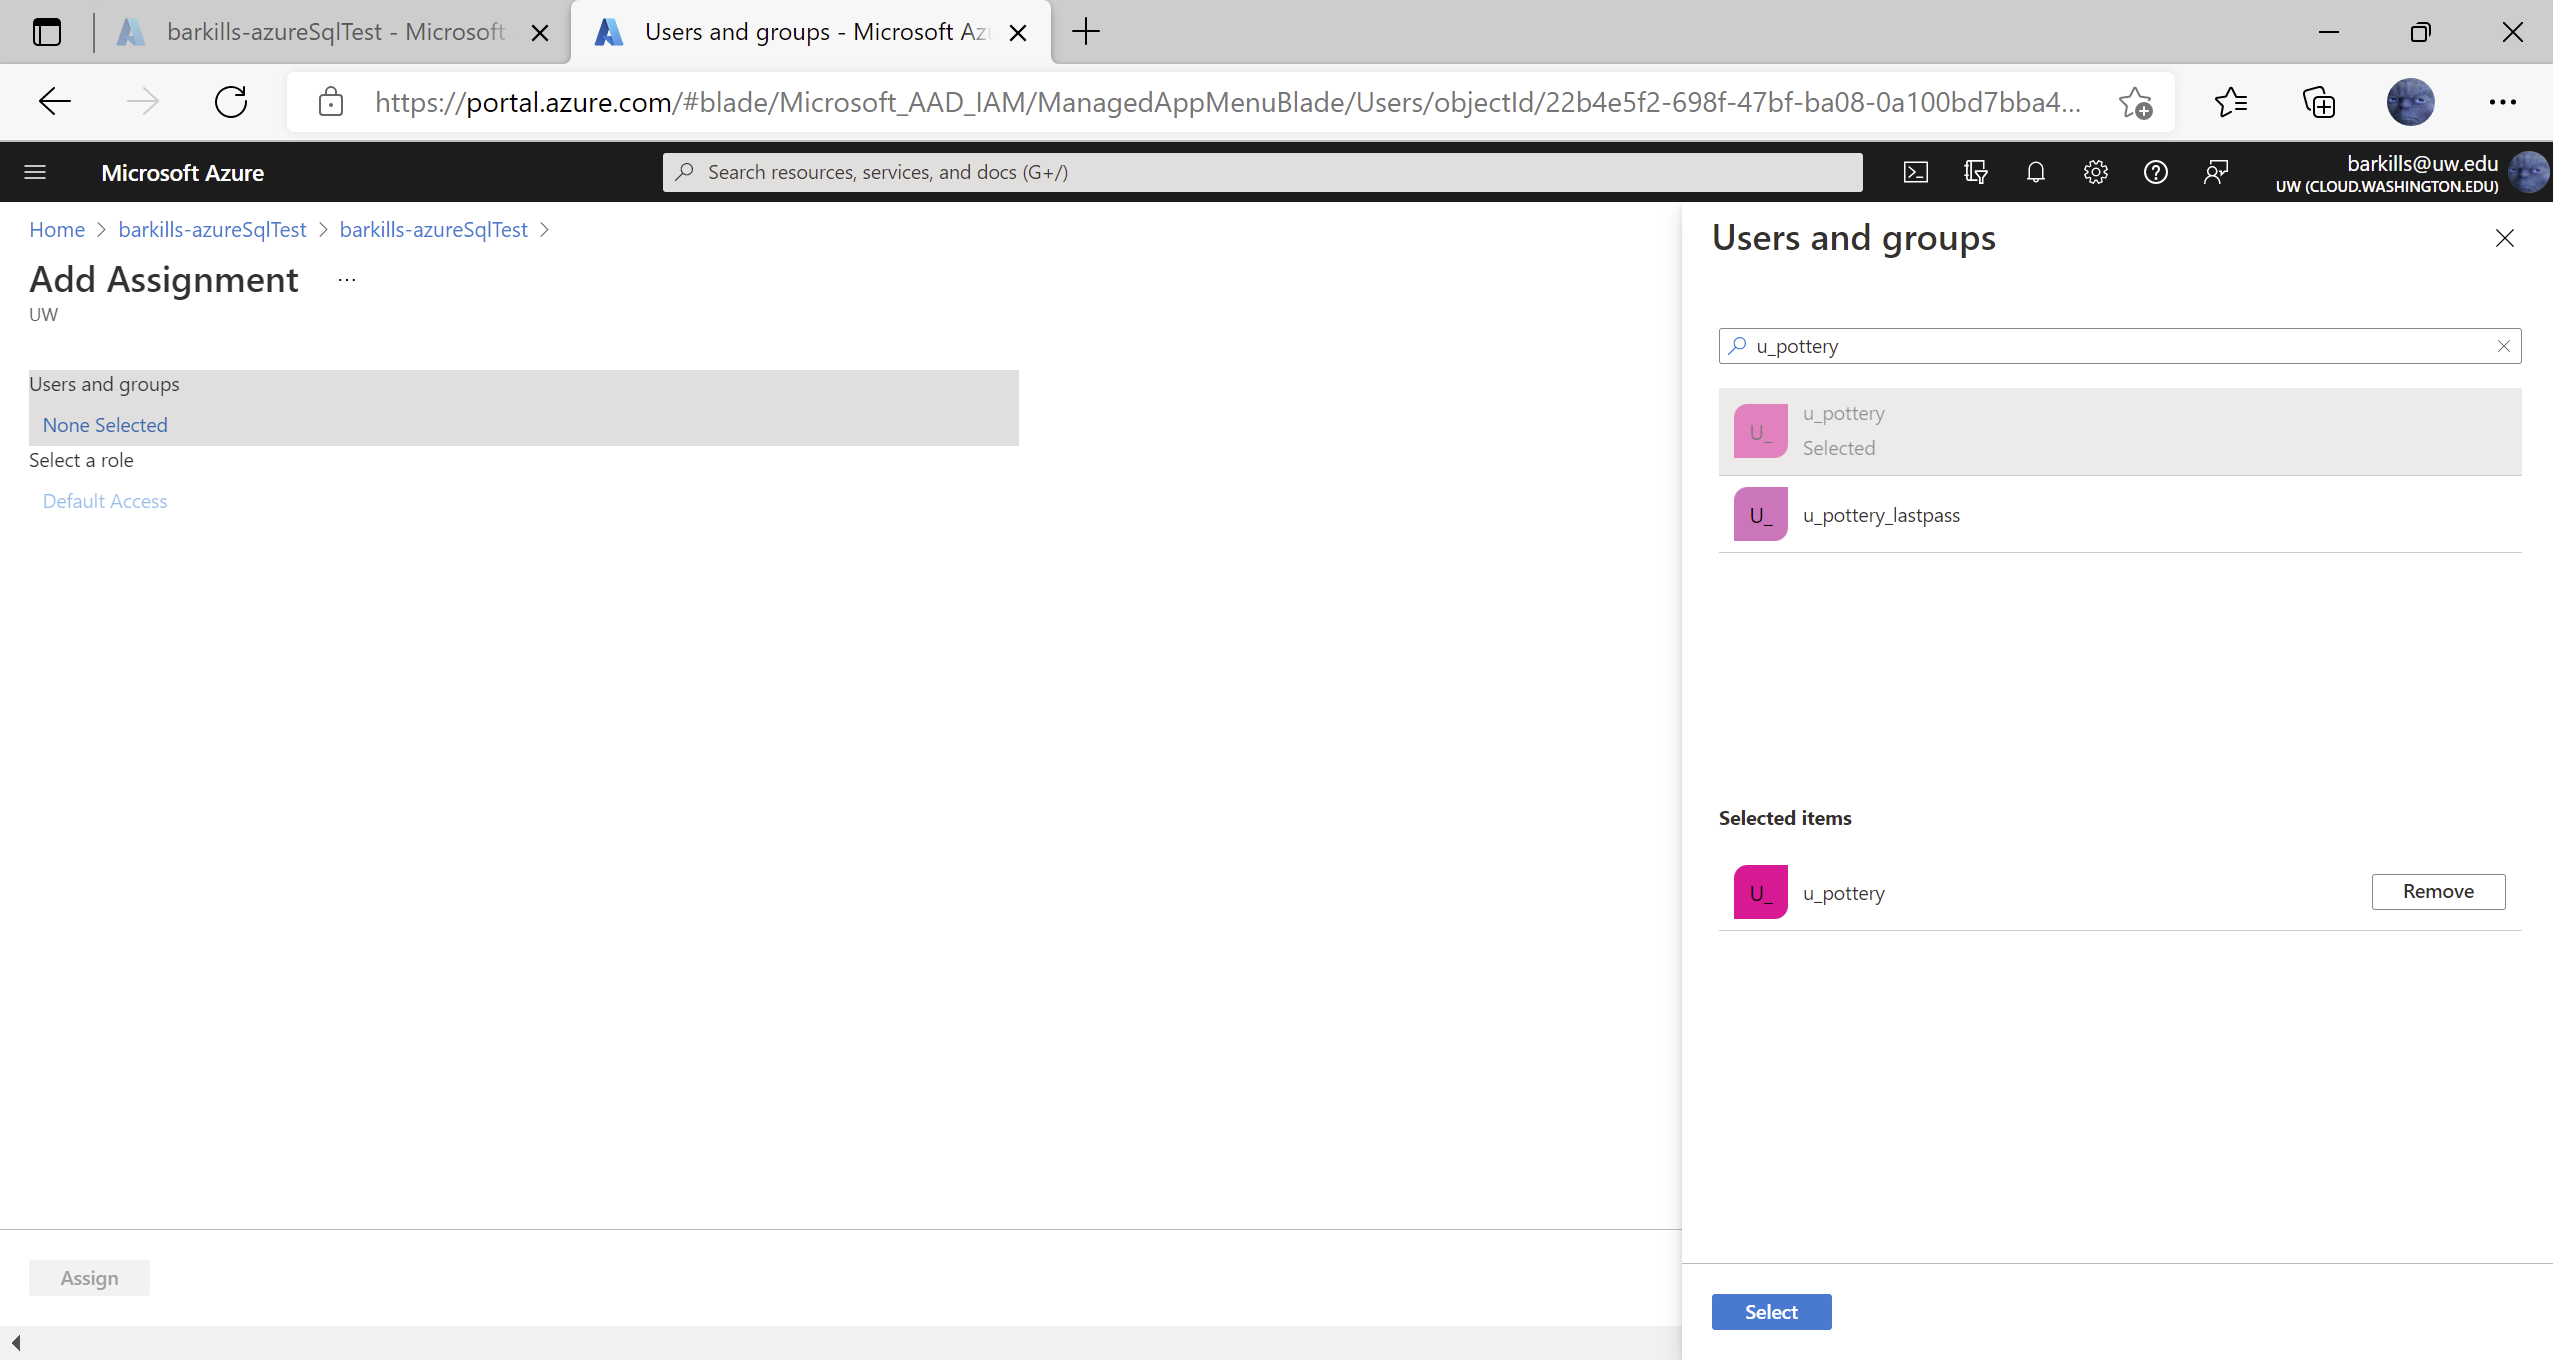
  5. Click on the right group which shows up in the pick list under where you typed. After clicking on it, note that it shows up below under “Selected items” Screenshot showing "Selected items".
  6. Click on “Select” button at bottom
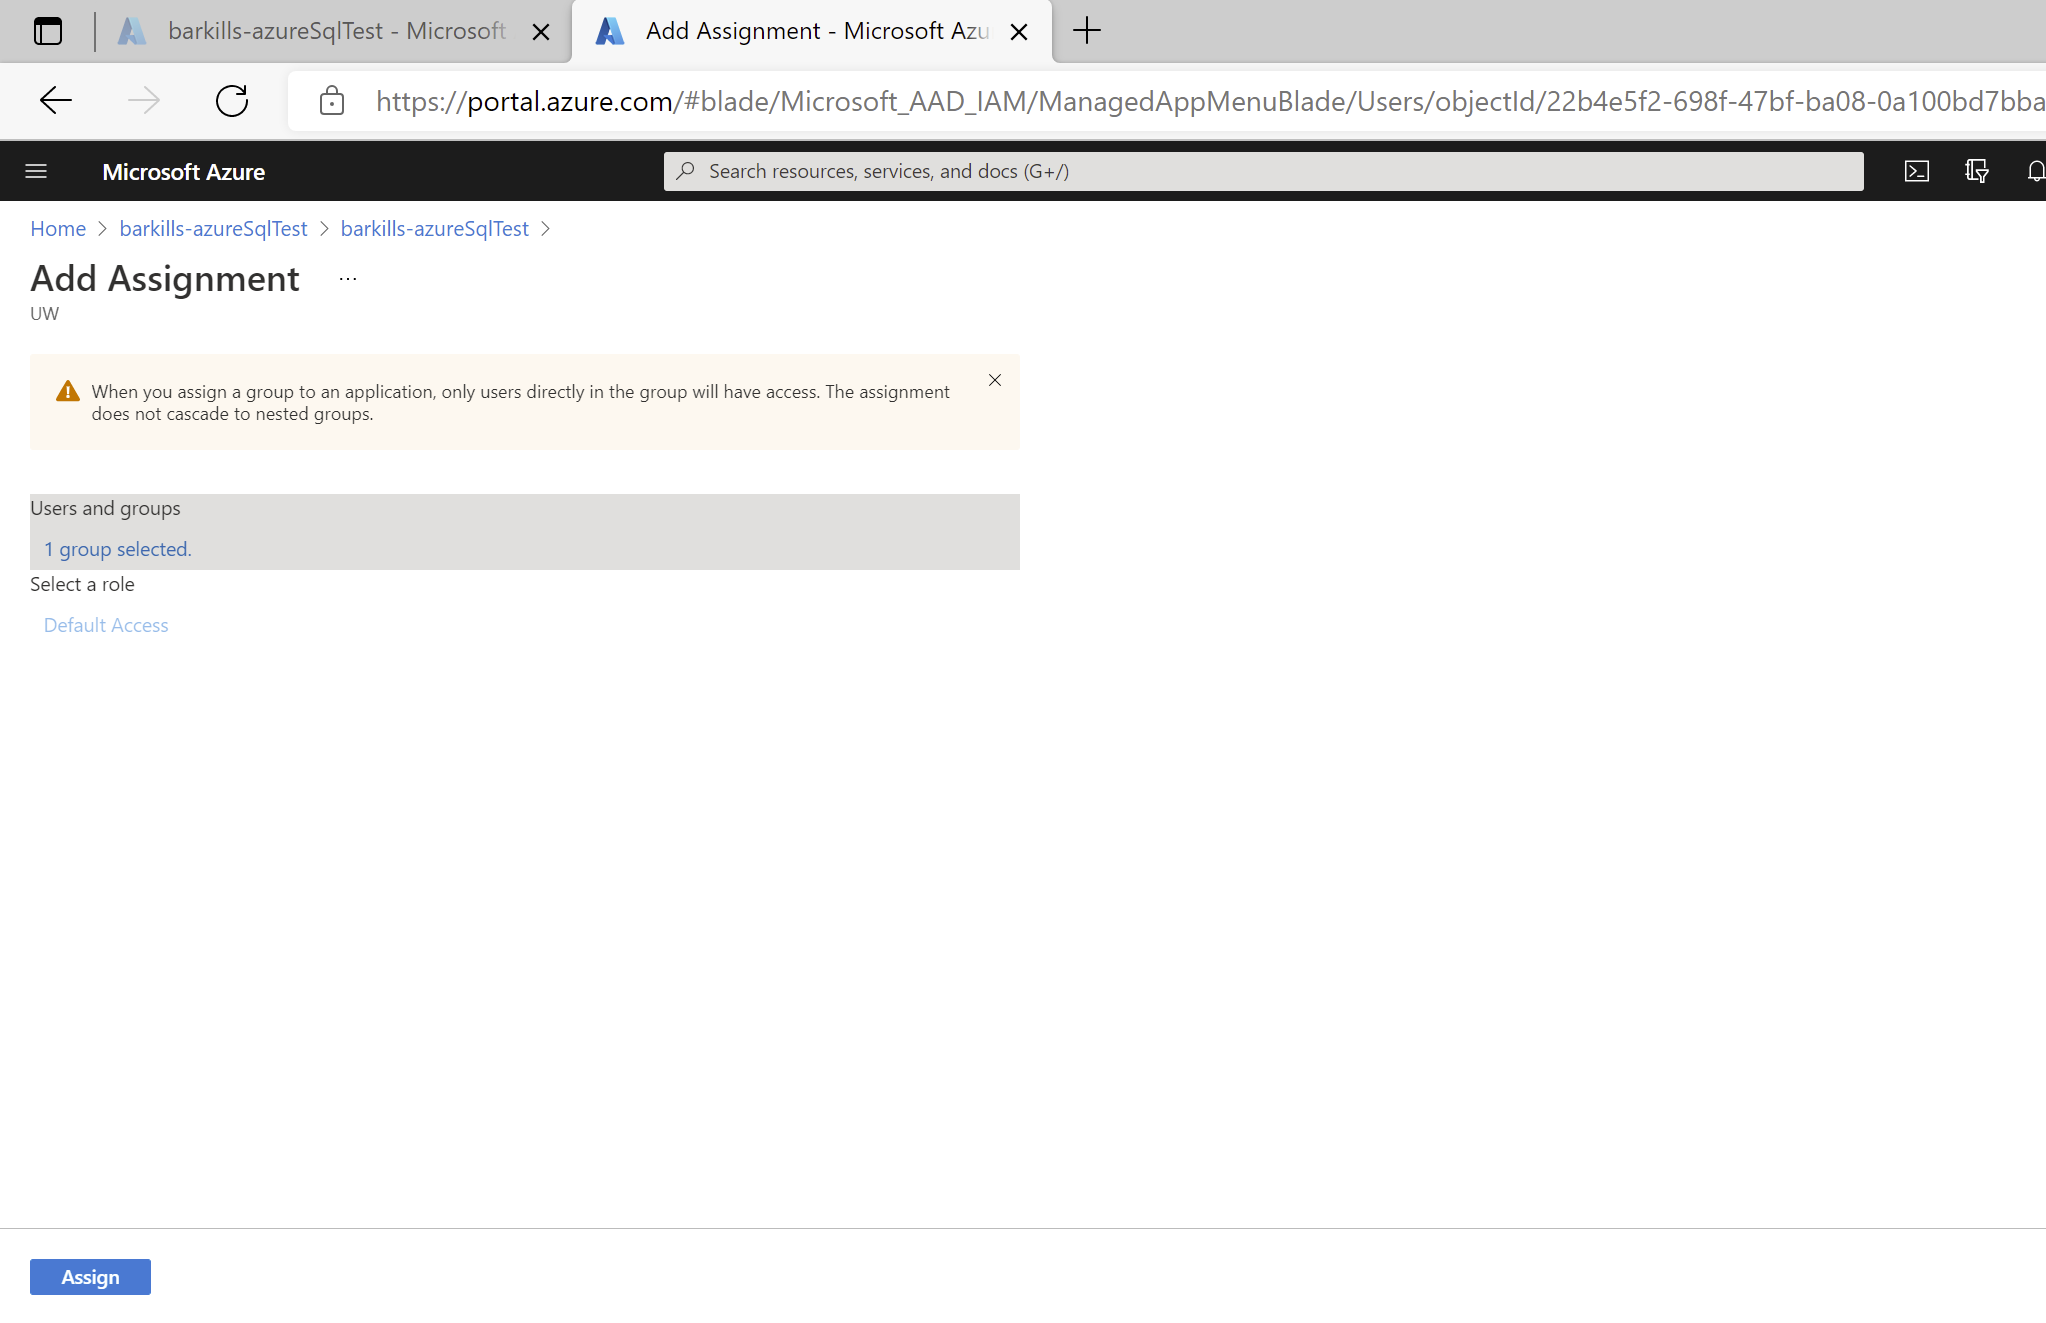
  7. Click on “Assign” button at bottom Screenshot of "Add Assignment" screen.
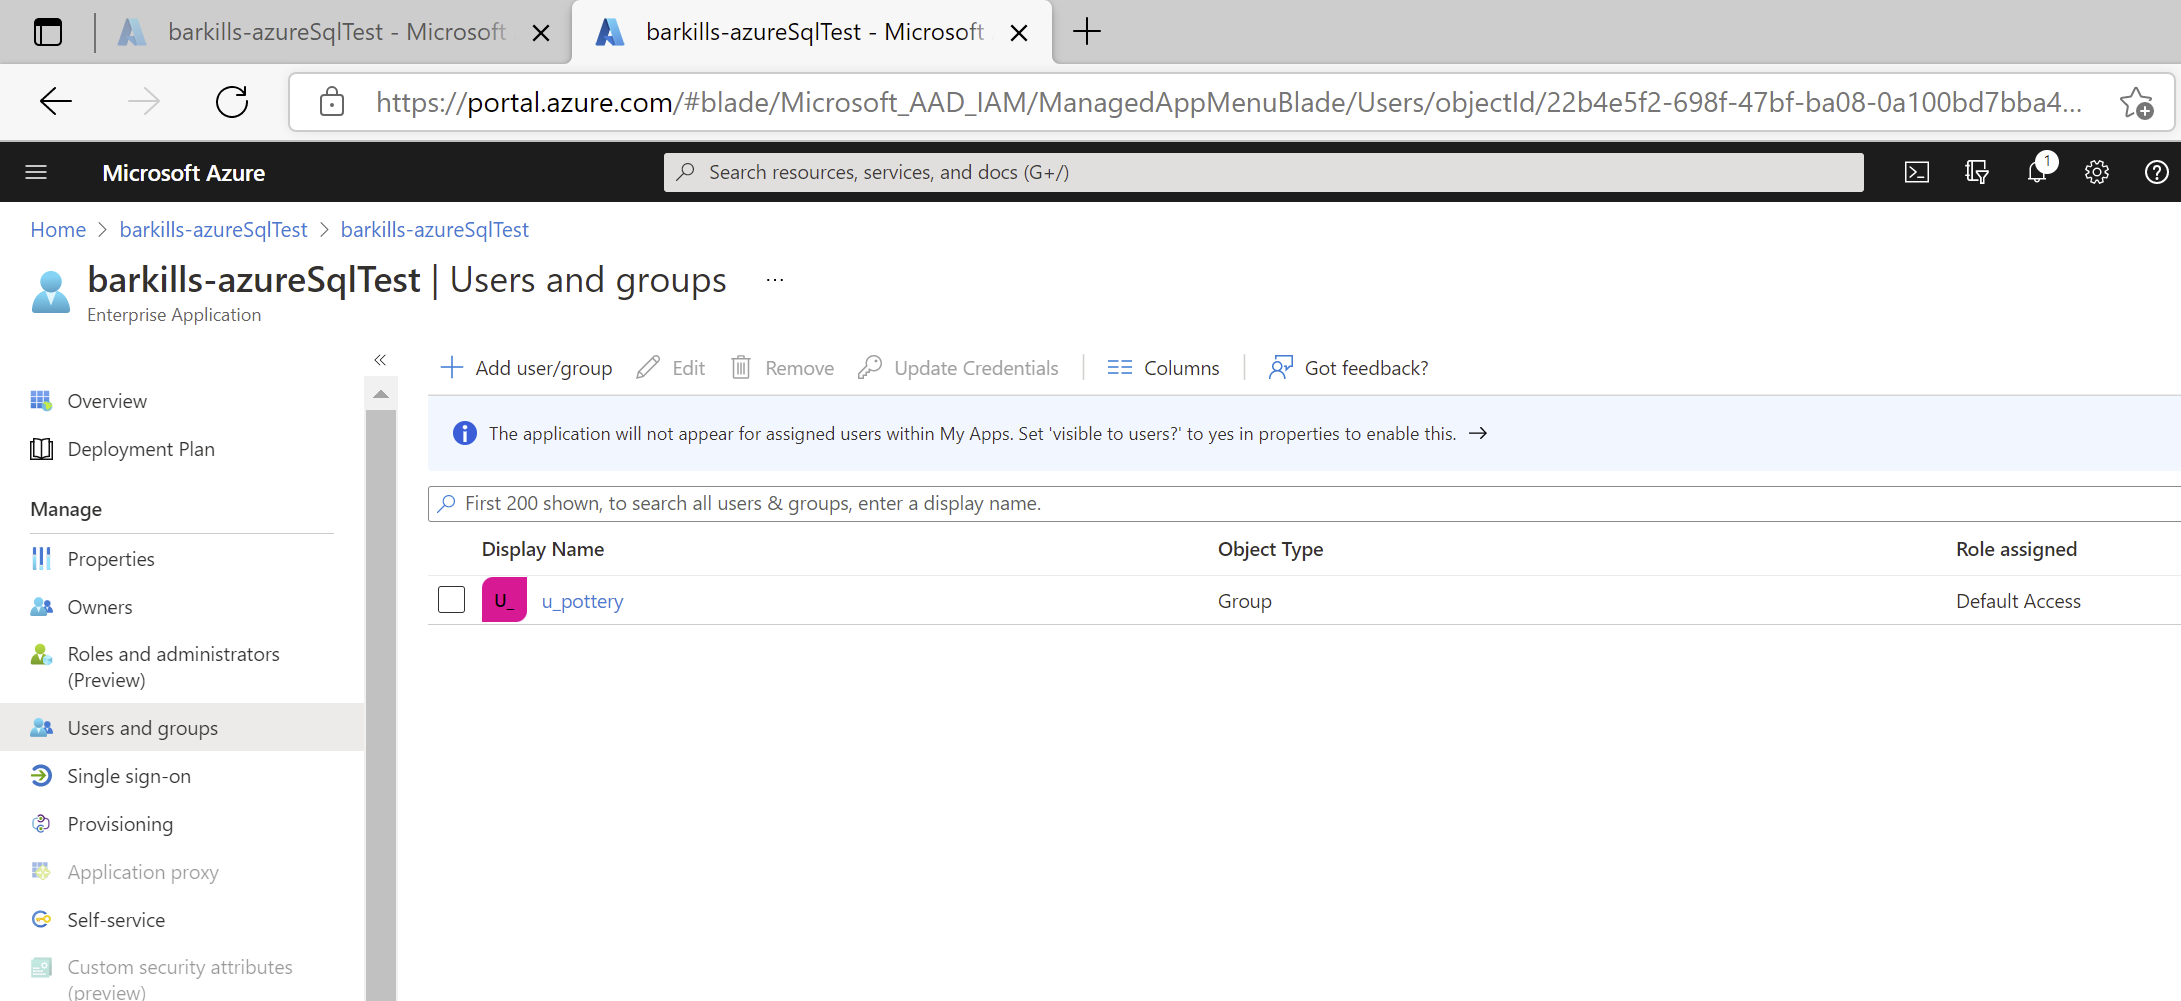
  8. Note the group chosen listed on the Users and Groups screen Screenshot of "Users and Groups" screen.

  [/section] [section title='Entra ID Application Configuration: Verify basic connectivity'] Once both the Entra ID application and your software has the required information configured, you can test that it works properly. For SAML applications, the Single sign-on page has a “Test” button. Click on it to initiate an IdP initiated authentication to your application. For OIDC applications, there isn’t an automated way to test. You’ll need to verify basic authentication by having your software send a token request and seeing if it gets back a successful response. [/section] [section title='Entra ID Application Advanced Configuration: Claims'] The default SAML claims provided by Entra ID are:

If you need more claims, you’ll need to add them. Entra ID sources all data for claims from Entra ID itself. This means the possible claims you can add are restricted to data which is present in UW Entra ID. Entra ID supports a wide variety of data transformations and conditions for claims issuance. https://docs.microsoft.com/en-us/azure/active-directory/develop/active-directory-saml-claims-customization documents the basic process of adding claims, including transformation and condition capabilities. https://docs.microsoft.com/en-us/azure/active-directory/develop/active-directory-enterprise-app-role-management covers application-specific role-based claims. This allows you to assign a role within your application based on claims data. If you have written your own application, see https://docs.microsoft.com/en-us/azure/active-directory/develop/howto-add-app-roles-in-azure-ad-apps for a more detailed description. If you have written your own application, then you have an Entra ID application object, and you may want more control over what claims are provided. You can use the application manifest (e.g. via the Application Registration interface) to do that. https://docs.microsoft.com/en-us/azure/active-directory/develop/active-directory-optional-claims discusses this topic. If you need claims which rely on group membership data, we have strong recommendations. When configuring your “Group Claim”, choose the 'Groups assigned to the application' option. This will ensure that users who are members of a lot of groups do not get an extremely large access token filled with groups which are not relevant to your application. To make this option work, you only need to assign the relevant groups to your application. See User Assignment. If you can’t assign all the relevant groups to your application, then use the Advanced options to filter which groups are included in claims for your application. https://docs.microsoft.com/en-us/azure/active-directory/hybrid/how-to-connect-fed-group-claims provides detailed information relevant to configuring group claims. [/section] [section title='Entra ID Application Advanced Configuration: Scopes'] Your application (usually an API) may need to define permissions for the purpose of allowing other applications the ability to leverage OAuth consent to take actions on behalf of another user. This is an advanced topic and we’d recommend you talk with UW-IT about your goals and how to best achieve them. https://docs.microsoft.com/en-us/azure/active-directory/develop/quickstart-configure-app-expose-web-apis#add-a-scope covers the process of creating a hypothetical OAuth scope for an example application. https://docs.microsoft.com/en-us/azure/api-management/api-management-howto-oauth2 covers the process of both setting up a scope and having a 2nd application leverage the scope of the 1st. https://docs.microsoft.com/en-us/azure/active-directory/develop/v2-permissions-and-consent is a comprehensive introduction to OAuth scopes which are sometimes called API permissions or OAuth consent. [/section] [section title='Entra ID Application Advanced Configuration: Consent'] Your application may need to take advantage of well-known OAuth scopes (permissions) that other applications have published as available for use with consent. These can only be added to applications whose application object lives in the UW Entra ID, i.e. application objects which you own. You can add these to the application manifest or via the App Registrations interface’s API permissions screen. Note that scopes which are of type ‘Admin’ will require UW-IT authorization, presuming a valid business need and adequate risk mitigations. [/section] [section title='Entra ID Application Advanced Configuration: Provisioning (SCIM)'] The Entra ID application identity is a bridge between the software providing the application's functionality and the Entra ID users who might use that software. Via User Assignment, you determine which user accounts are allowed to access the software via the identity integration, but via User Assignment you don't actually make any configuration change to the software itself. Lots of software, especially Software as a Service (SaaS), include the idea of an instantiation of each user within the software's configuration. This allows the software to customize the user experience by storing special information about the user, such as profile information, special access roles, and more. When the software has a local instantiation of each user, it tends to approach this one of three ways:

  1. An application administrator must create each local (to the software) instantiated user account (in addition to the Entra ID application user assignment). Likewise, removal of user accounts are the responsibility of the application administrator.
  2. The application creates each local instantiated user account "just in time" when an Entra ID user account shows up. The local user accounts tend not to be removed, unless the application administrator realizes this is a gap and fills it.
  3. SCIM provisioning is supported by the software. This requires that the software provides an API which can be called by the application integration platform, in this case, Entra ID.

Entra ID application provisioning refers to automatically creating user identities and roles in the applications that users need access to. In addition to creating user identities, automatic provisioning includes the maintenance and removal of user identities as status or roles change. If your application is pre-integrated, it may also support SCIM provisioning. In that case, there will be instructions on how to get it setup. If an application supports SCIM provisioning, you use the Enterprise Applications, Provisioning section to configure it & the Enterprise Applications, Provisioning logs section to review activity and troubleshoot. If your application is not pre-integrated, there are several possible paths depending on the scenario:

There are a few gotchas:

For more information about how to add SCIM support to your application to achieve provisioning, see https://docs.microsoft.com/en-us/azure/active-directory/app-provisioning/. [/section] [section title='Entra ID Application Advanced Configuration: Conditional Access'] Conditional Access (CA) is a powerful feature that allows security controls to be enforced at the time an access token is requested based on a variety of conditions. UW support for Conditional Access is limited at this time. If you feel you need a CA policy, send a request and we’ll consider it. Conditional Access can lead to significant unexpected impacts, so we have to exercise judicious vetting and practices to prevent undesirable outcomes. Also note that many of the CA conditions possible may not be viable. A summary of the options is represented in this grid:

Assignments
Users and groups Include | Exclude
Cloud apps Include | Exclude
  User actions
  Register security information
Conditions
Sign-in risk (Entra ID Identity Protection, via Entra ID P2) High | Medium | Low | No risk
  Note: Typical risks are atypical travel, unusual login, malware linked ip, leaked creds, known attack pattern
Device platforms Include | Exclude
Locations Include | Exclude
Client apps Browser | Mobile apps and desktop clients | Modern authentication clients | Exchange ActiveSync clients | Other clients
Device State Include | Exclude, where {Device Hybrid Entra ID joined, Device marked as compliant}
Access controls
Block access  
Grant access Require Multi-Factor Authentication
  Require device to be marked as compliant
  Require Hybrid Entra ID Joined device
  Require approved client app
  Require app protection policy
  Terms of Use
  Require one of the selected controls
  Require all of the selected controls
Session Use app enforced restrictions
  Use Conditional access app control (Cloud App Security, via M365 A5) See https://docs.microsoft.com/en-us/cloud-app-security/proxy-intro-aad & https://docs.microsoft.com/en-us/cloud-app-security/session-policy-aad
  Sign-in frequency
  Persistent browser session

  Conditional Access is an extensive topic, with more information available at https://docs.microsoft.com/en-us/azure/active-directory/conditional-access/overview. Developers may find https://docs.microsoft.com/en-us/azure/active-directory/develop/v2-conditional-access-dev-guide useful. [/section] [/accordion]